Studio Thinking and Scientific Research: Building and Tinkering with Wood
 Project Goal: Learning the affordances of wood as the children plan, develop, and create moving objects to further and deepen their understanding of physical science (gravity, speed, momentum, force/push, friction).
Teaching and learning trajectory [September through November notes]: S tudents to engineer plans for objects that move (drawings)/next steps –> playing with materials first (no nails, no glue) –> introduce tools (no instructions on how to build) — > children free build –> we discuss what’s working and what is not –> share engineering strategies –> figuring out the wheels and axles –> FRUSTRATION (put wheels on with nails or??) –> Aha! moment (screws!) – -> Rob visits to offer us new ideas about aerodynamics and design –> THE HOEDOWN DERBY/ specs –> conversation: better to build with a kit or no kit? –> constant refinement/retooling/rethinking –> what will this teach the children about movement? –> testable questions/variables arise –> children record specs for their cars –> TESTING on different terrain–> frustration/rethinking/retooling – lather/rinse/repeat…
It has now been several weeks since our class has taken on the daunting task of creating their own cars to think more deeply about movement, and in looking back upon my notes and our process, several things come immediately to mind. When you’re teaching in the constructivist model, you never do know where your project work is going to take you on any given year ( or week or month ). That is both the surprise and teachable moment for you as an educator that always keeps you on your toes. You activate your students’ background knowledge, you offer up rich provocations, and you wait to see what bubbles up…and then you try to discern the path that will take them to a deeper understanding through authentic experiences that cultivate rich intersubjectivity. On the outside looking in, you may wonder…how do you plan for this? How do you know where to go? How do you know that learning will happen? In my now five years of working in this way I can sincerely offer you this: it is never easy, straight-forward, or simple. Amongst my peers, we talk about the messy disequilibrium of our work and the trust we place in the process. Sometimes we cannot see the forest for the trees and that’s where we help each other suss it out. The children we are entrusted with share with us their understandings and in so doing also communicate their gaps in understanding. We listen for those silences and then work with them to fill them in. Ultimately, the children lead the way.

Our provocation experiences got the children thinking more about making cars to test their theories about movement.
- Max H: I got my idea from the ramps [the Brachistochrone]. We tested with marbles. I want to see it with cars. I want to make more and see which materials are faster (gravel, wood, etc.).
- Alexander: It could be cool to experiment with different tires and different tracks, like big tires, regular tires…
- Sam: We could maybe try a steep hill versus a gravel hill…
- Neil: I want to test different tracks. We could time them.
When it became apparent that the children would need to build their own cars to learn more about movement, I realized that I would have to go outside my own comfort zone. We would need to work in wood.
MESSING WITH MATERIALS
 Why let the children mess about with materials (without introducing tools, nails, and glue) first? To let them to think about what they might be able to do (before they do it) and to plan how to best use the materials available to them. Giving them a palette of possibilities allowed them to to envision and think through their next steps as movement engineers.
Below: the children trying to figure out how they might attach the wheels:


When we did introduce the tools, we did so carefully, talking through what the tools could – and could not – do, and we discussed safety precautions. I brought in a work bench from home to help secure items that would need sawing, but also instructed the children on how to safely drill, saw, sand, and hammer.
 Left: “They wouldn’t even let me touch wood at my old school. They were afraid I would get splinters!”

Center: One student spent several sessions sawing walnut wood. When it later split, she was determined to try again with a less challenging wood. A friend saw her jump right back into building, remarking, “that’s showing flexible thinking!” Right: New staff member Maeve Shea was invaluable in bringing their woodworking expertise to assist the children.
Maeve: I was mainly helping the students cut wood with the hand saw. For many students, it was their first time using a saw, but that didn’t stop them from jumping right in. I loved seeing the students cheer each other on as they finished a cut. I think having patience in a process leads to results you can feel proud of. While working with the third graders while they built their cars, I was able to see their confidence grow throughout the weeks. Things inevitably failed and new ideas had to be tested out. As the students tried different techniques to make their cars, I noticed many students giving advice to their classmates. Wood is a great material to learn from because it forces you to plan ahead, but also to learn from your failures.

Persisting Through Trial and Error
- Skylar: I’m using the big nails and every time they don’t go in far enough.
- Neil: If you use the big wheels, you have to use the big and long nails.
- Sam: Why don’t the people who had success with the nails help the people who are still trying to nail [their wheels] in?
- Max H: If you hammer the nail in all the way, the tires won’t move. That’s why the smaller tires won’t work as well, because if you hammer them in further, they won’t move as much.
- Skylar: I don’t recommend the small wheels because I hammered it in too far and the wheels won’t turn.
- Is nailing the only way to attach the wheels?
- Neil: You could try screwing them in…


SHARING STRATEGIES
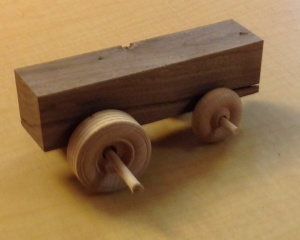
Individually, each child tried figuring out how to attach the wheels to their cars. A variety of wheels were made available to the children – small, medium, large, smooth, treaded – as well as a variety of woods for the bodies of their cars (birch, cherry, poplar, walnut). Finding the right nails to use proved trickier than expected. Almost all of chidren tried nailing the wheels in first, but soon found this to be unsatisfactory – if the wheels were nailed in too far, they wouldn’t move, and even if you thought you had nailed them in correctly, the wheels might not turn well… and they had a strange tendency to pop off a lot during testing. As they continued to work, the children shared strategies. While a few kept their wheels nailed in, there was an aha moment when Reese, Max H., and Neil came to the realization that screws would work better to hold the wheels on, which prompted most everyone to make adjustments to their own cars. After some initial tries with the screws, the children also came to share their realization that drilling holes into the car first before attaching the tires with screws was optimal. In all of this, there was a lot of trial and error, moments of real frustration, design discoveries, and a lot of peer support. And joy.

Left: Alexander was the only one to try a unique axle and wheel arrangement, threading a wooden axle through a plastic cylinder and then attaching the wheels to the axle on either side of the cylinder. This was then duct taped to the bottom of the car (the wire beneath the tape is intended to give his car more weight and hopefully increase its speed).
In reflecting on the flexibility required of these tasks, Max P. considered all the design decisions the class had to make and how he and his classmates were able to navigate it all. “[We had to think about] what things to use, what kinds of wood, nails, wheels to make your car. Not just sticking with one thing, but thinking of other strategies to use [and] not saying, ‘I’m not going to stretch my mind out.'” We asked the children how many of them had stretched themselves in working through these initial building phases, and everyone raised their hands. Later I asked them about working without a pre-made car kit and the challenges they faced in utilizing their own ideas and designs – Why do you think we didn’t give you kits to make your cars? D o you think it would be better to work with a kit or not?
- Sam: [No kit, because] you can put whatever you want on [your car]. You can let your mind go free.
- Juliet: I guess no kit is better, but a kit is easier.
- Juliette: Not having a kit, you can be more original.
- Alexander: No kit is better, because you can do whatever you want, because with a kit, they pick the shape of the block, but with no kit, you can pick the shape you like. With a kit, it is very strict, but with no kit, you can do whatever you want, and if it doesn’t work, it’ll be okay because at least you made it. Having a kit for this [project] wouldn’t actually stretch our minds. Like we could just copy someone else’s. Having no kit stretches our mind like asking, “How do I actually do this?”
- Sam: You have more ideas in your brain that you can make come true. You can challenge our minds and get us thinking about [engineering] stuff and design.
- Max P: So our minds could think flexible [sic] and we could choose. Usually a kit is going to be like this: you put this specific thing on this thing. If you have no kit, I could put this on and this on and this.
- Reese: I think you should not use a kit because then it’s yours. Then you could be proud of what you made up.
The post Studio Thinking and Scientific Research: Building and Tinkering with Wood appeared first on Sabot at Stony Point.
SHARE THIS POST